Do-it-yourself rafters for a gable roof: design and installation
When planning the construction of low-rise residential, ancillary or commercial buildings, most designers choose a gable roof structure. This is due to the relatively simple installation technology, increased structural reliability, effective drainage of precipitation from the roof and unpretentiousness to operating conditions. However, in order to achieve all the advantages, you need to correctly design and install the rafters for a gable roof with your own hands.
The content of the article
- 1 Features of the device of gable roofs
- 2 Preparatory work
- 3 Rafter load calculator
- 4 Calculator for calculating the length of the rafter legs
- 5 Calculator for calculating the elongation of rafters for the formation of eaves
- 6 The stage of installing the rafters of a gable roof with your own hands: video and photos of all stages of work
- 7 Conclusion
- 8 Video: gable roof rafter system
Features of the device of gable roofs
Gable roofs are two rectangular inclined planes (slopes), which are supported by the rafter system. The side parts are made deaf or windows and siding are installed on them. The main parameters of such a roof are: the angle of inclination and the location of the ridge relative to the center line passing through the walls perpendicular to the slopes. That is, the gable structure does not have to have the same slope of the slopes or have a symmetrical appearance.
Many original projects use an asymmetrical design of slopes to take into account some climate features, or in order to improve the design of the facade. It is worth noting that such solutions are very original, but in practice they are quite difficult to implement. This is due to the following reasons:
- The load on the walls and foundation increases in the place where the roof ridge is displaced.As a result, calculations can be significantly complicated, especially when using heavy roofing materials such as slate or ceramic tiles.
- It is required to produce separate structural elements for each slope, which can significantly increase the construction time.
- The pressure of wind currents can significantly influence the roof at large slope angles. Therefore, it will be necessary to take into account the preferred direction of the winds when calculating.
The main elements of the pitched roof system
Before making the rafters on a gable roof, you need to create a project, and also study all the structural elements. You will need to design the following main nodes:
- Mauerlat... Provides the transfer of the load of the roofing structure to the load-bearing walls of the object, creating its uniform distribution. The timber is made from hardwood such as larch, oak, ash. The minimum allowable section is 100x100 mm. It is allowed to use not only solid timber, but also glued timber, but with a section of 100x150 mm.
- Rafters... The main structural element, which is designed to form a supporting frame, to absorb the load of the roofing material through the sheathing and transfer the load to the Mauerlat. The distance between the rafters of a gable roof is between 0.6 and 1.2 m, depending on the weight of the roofing material and the amount of precipitation in the particular area.
- Tightening... A special design used to fix two inclined beams of slopes at a given angle of inclination, which is attached at a level slightly above the beams or slightly below the ridge. It is used in layered types of roofs.
- Rack... It is a vertically installed and firmly fixed element that performs the load-bearing functions of the roof. It is usually installed on the walls of the building to partially transfer the roof load. Gives additional rigidity to the structure.
- Run... There are two types: side and ridge. The lateral one is a bar resting on the racks and parallel to the ridge beam. Allows you to prevent the slope from bending under significant loads. The ridge run is installed along the line of abutment of one slope to another and serves as a support for the ridge.
- Brace... Provides auxiliary supports for racks that are angled 450 to the load-bearing beams of the ramps in order to increase the contact area with the racks and reduce the risk of deformation of the ramp.
- Sill... Serves as a fulcrum for the brace and rack.
- Lathing... It is used to fix the rafter system in the transverse direction, transfer the load of the roofing material and its fastening, as well as provide resistance to loads in the purlins between the load-bearing beams.
Helpful information! Braces for the northern regions due to increased snow and ice loads on the roof are allowed to be installed not only longitudinally, but also diagonally. Thus, it is the racks rather than the walls of the building that take up a significant part of the load.
Types of gable frame systems
Do-it-yourself rafters for a gable roof can be hanging or layered. The hanging structure only rests on the side walls. Therefore, it is used only for installation on buildings with a distance between the walls of no more than 12 m. To prevent collapse of the structure, auxiliary horizontal or vertical elements are used to increase the strength and reliability of the structure. The most successful elements are: brace, crossbar or tightening. They can be fixed not only to the ridge beam, but also directly to the pitched beams themselves at certain angles.
Helpful information! If you plan to use the attic as a living space, then it is recommended to use puffs as supports, which will save maximum space.
For buildings with load-bearing internal walls, it is allowed to install layered pitched beams due to the possibility of installing additional supports. As a result, the limitation of the hanging system can be avoided and load-bearing beams can be installed even when the distance between the walls is more than 10 m. The spacing between the supports is selected for each structure individually, taking into account the purpose of the building and the use of the attic space.
Related article:
Do-it-yourself shed roof step by step. In a separate publication, a practical guide for the installation of a structure is presented with useful tips and photos.
Preparatory work
Do-it-yourself rafters for a gable roof should be installed only after the preparatory work has been carried out. They consist in designing a pitched structure, creating a cost estimate, and selecting the necessary materials and tools. However, the main part of the work, undoubtedly, is the competent calculation of all parameters.
Calculation of loads on rafters for a gable roof with your own hands
When performing calculations, it is important to correctly calculate the load on the roof frame. There are three types of loads:
- Permanent... They include the weight of all materials used: insulation, battens, insulating films, roofing material, additional elements, ebb and snow retention systems, finishes, attic elements etc. Approximate loads when using some roofing materials are shown in Table 1.
Table 1. Load on the rafters depending on the roof material
Attention! It is recommended that when designing a 1 m structure2 there was a load of up to 50 kg, since otherwise the load on the walls will increase and you will have to lay a buried foundation.
- Variables... They are valid only under certain conditions, for example, during precipitation, roof repair or maintenance, wind loads, etc. When calculating, use the maximum values of the desired values.
Helpful information! Do-it-yourself installation of rafters for a gable roof must take into account wind loads. To calculate them, you should take the indicators averaged over the region and multiply by the correction factor, which can be found in SP 2.01.13330.2011. Additionally, the location of the building should also be taken into account, for example, if the house is detached, then it experiences maximum loads.
According to SP 2.01.13330.2011, the snow load is defined as the total snow load multiplied by a correction factor that determines the wind and aerodynamic pressure. Snow weight per meter2 can be from 80 to 320 kg.
Important! If the slope of the slopes is more than 600, the snow load should not be taken into account.
- Special loads... Determined by seismic and / or storm natural phenomena. For the middle lane, they can be neglected, having made a margin of overall strength of 10-15%.
Determination of the angle of inclination of the slopes
The angle of inclination of the roof is determined primarily by the roofing material. It is usually selected based on the following criteria:
- for soft roof – 50-250;
- for hard - 200-450.
It is also worth being guided by the fact that the smaller the angle of inclination, the better the streamlining of the roof. At large angles, precipitation is quickly removed from the slopes, and it also becomes possible attic creation.
Calculation of the length and pitch of the rafters
When installing rafters for a gable roof with your own hands, you need to observe the step of securing them 0.6-1 m. The choice depends on the design loads, taking into account the safety factor. The smaller the step, the stronger the structure and the greater the consumption of building materials. A large interval of 0.8-1 m is allowed to be used only when laying light roofing sheets and angles of inclination 150-200... It is recommended to choose a step within 0.6-0.8 m.
The length of the beams, knowing the angle of inclination of the slopes and the distance between the two walls of the object, can be calculated quite simply by the Pythagorean theorem. However, the real length needs to be increased by 60-70 cm, which will go to their joining, as well as to the overhang of the slopes of about 0.5-0.6 m.
Calculator for calculating the length of the rafter legs
Calculator for calculating the elongation of rafters for the formation of eaves
Helpful information! Since the standard length of the timber is up to 6 m, for roofs with large areas, they can be extended, docked or joined.
Determination of the cross-section of rafter pairs
The calculation of the cross-section of the rafter for a gable roof plays an important role for the installation of the roof structure with your own hands, since the reliability and durability of the roof will directly depend on this. When calculating, it is important to consider the following factors:
- the type of wood used in the construction of the rafter system;
- type of timber used: solid or glued;
- length and pitch of pitched beams;
- total load.
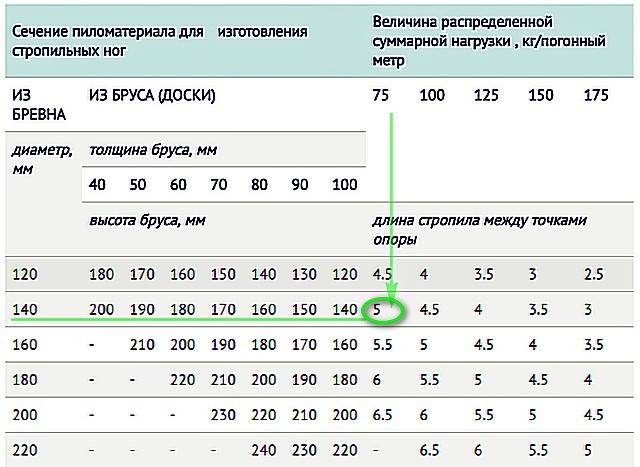
To determine the cross-section of the beams, taking into account their pitch and length, it is necessary to use Table 2.
Table 2. Dependence of the cross-section of the timber used for pitched beams on the length, pitch and load
Important information! The larger the pitch of the supporting beams, the greater the deforming force they perceive and the need to increase the cross-section of the supporting structure increases.
Based on the calculated data, it is required to draw up a drawing and assess the financial costs by drawing up an estimate. After that, you should purchase the necessary building materials.
The stage of installing the rafters of a gable roof with your own hands: video and photos of all stages of work
Installation of gable roof rafters is carried out only after all stages of preparatory work and calculations. The step-by-step installation instructions contain the following steps:
- Mauerlat mount;
- preparation of structural elements;
- installation of rafter legs;
- installation of the lathing.
Mauerlat mounting methods
Mauerlat fixing methods differ depending on the base material of the wall. When erecting log or wooden houses, the crown trim can serve as a Mauerlat. If the walls are made of aerated concrete or bricks, then the Mauerlat is fastened to specially installed steel pins along the entire perimeter of the outer walls with an offset to the center of the building or in the center. At the same time, in any mounting option, it must be 50 mm away from the outer edge.
In most cases, it becomes necessary to increase the length of the beams. The most convenient way is to mount it in the paw. It is done at an angle of 900 or 1800... To do this, cut off half the thickness of the beam to a distance equal to twice the size of the larger side of its section, then apply them to each other, drill holes for several bolts of a suitable diameter, located in one row, and then connect them to bolts.
After installing the Mauerlat, ensure that the wood is protected from moisture. To do this, it is coated with bitumen or a waterproofing material is laid with an overlap with a distance of 10-15 cm.
Attention! When installing rafters for a gable roof with your own hands, it is necessary to take into account that a certain amount of moisture remains in the wood, which, in direct contact with metal, causes corrosive processes. To prevent them, you need to apply a protective coating to the metal.
The Mauerlat is attached to the wall with anchors, steel brackets, wooden pins, studs, hinges, or tied with wire.
The process of making rafter pairs
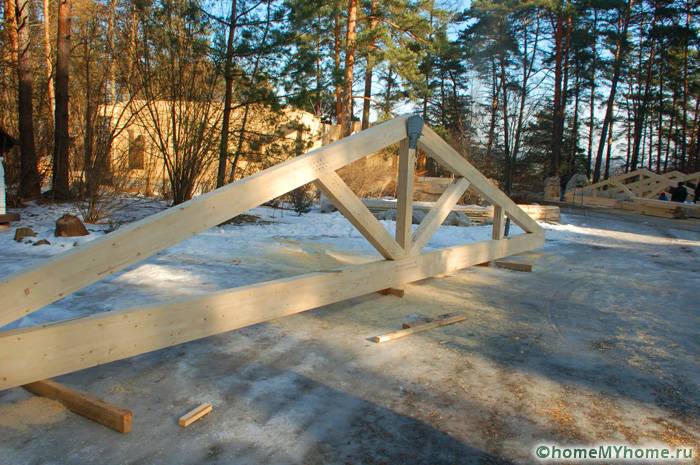
In order to ensure reliable fastening of the slope beams, you need to ideally match their pairs in size. Adjustments can be made on the ground or directly at the installation site. The first option is preferable for structures small in area and weight. Do-it-yourself rafters for a gable roof are made on a flat surface using any convenient tools. This will ensure high precision of their manufacture and almost perfect pairing. To lift them up, use improvised means or special lifts.
Installation directly on site is rarely used due to lack of space and the impossibility of using special tools. Therefore, it is recommended to use it only by specialists.
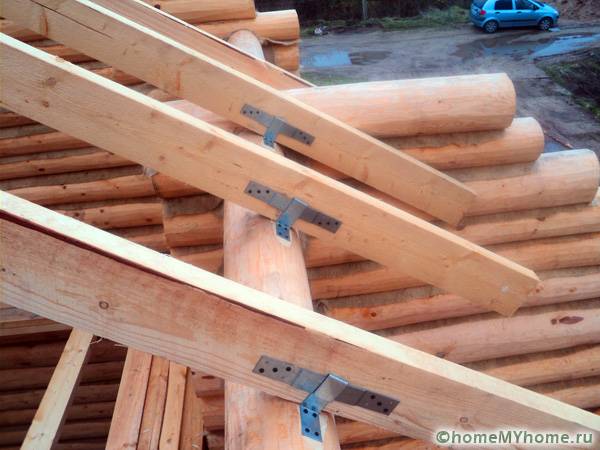
Before cutting the beams, you need to mark them with a marker and measure the length. It is advisable to make one pair to serve as a template. Then it is necessary to assemble the beams in pairs into single parts of the structure. Their connection to each other is performed "in a paw" with fastening on bolts or a crossbar. Alternatively, steel plates and nails can be used, hammering them at different angles to the surface so that they do not intersect inside the wood.
We install rafters for a gable roof
In order to correctly install the rafters of a gable roof with your own hands, a video or photo of the process should be studied in advance. Before installation, floor beams are installed with end-to-end fastening to the Mauerlat. The spacing of their placement is similar to the pitch of the pitched beams. For these purposes, a bar with a section of 120x120 mm or 150x150 mm is used. Fastening is carried out "in the paw" or on anchors.
To simplify the installation work, you can perform ceiling decking or at least temporarily lay boards. The prepared site will simplify the placement and fastening of the prepared parts of the structure.
The beams can be fixed to the Mauerlat by cutting off some of the touching beams to a depth of 1/3 of their cross section. In this case, it is important to observe the angle of contact so that they snugly engage each other. The second method of fastening is the installation of steel fastening plates on the sides of the abutment, apo in the center - the crossbar.
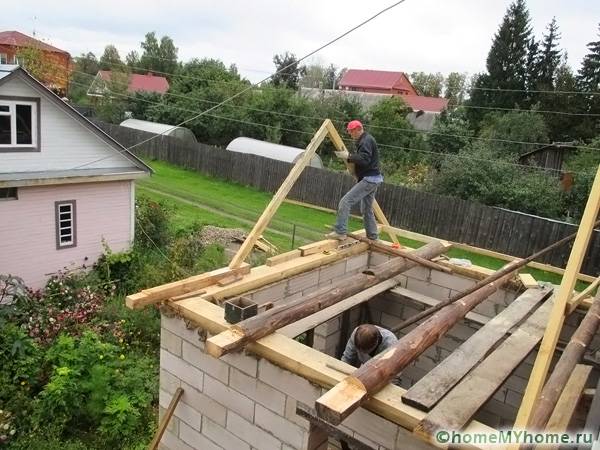
First, the structural elements assembled on the ground are installed on both sides of the slopes, they are temporarily fastened along the ridge with boards, and then intermediate ones are mounted. It is important to install in such a way that two flat surfaces of the slopes are formed. If the type of roof is layered, then it is necessary to install supports.
A ridge beam is installed at the junction of two inclined beams. Then puffs are installed. For a layered roof, struts are mounted. On the side of the slopes, the sheathing is laid with a pitch and thickness of the boards that meet the requirements for installing a specific roofing material. After that, the rafters for the gable roof are fully installed with their own hands.
Conclusion
- The construction of roof systems is described.
- The stages of rafter calculation are given.
- A step-by-step description of the installation of rafters is provided.
- Recommendations and remarks are given to prevent critical installation errors.
Video: gable roof rafter system


