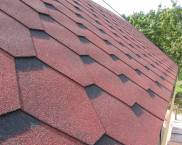
Flexible shingles: DIY installation with step by step photos
If flexible shingles are chosen as the roofing material, do-it-yourself laying can be done by a home craftsman without helpers. Do not confuse flexible roofing with soft roofing, which is presented as roll materialsused for flat roofs.
The content of the article
Overview, types, characteristics, pros / cons
Due to the extremely simple design that flexible tiles have, do-it-yourself laying is not difficult, even for a non-professional. This roofing material is produced in the form of shingles:
- a rectangular sheet of fiberglass with bitumen impregnation;
- the lower part is treated with SBS compound or natural bitumen for gluing to a continuous crate, the self-adhesive layer is protected during storage and transportation with a polymer film;
- from above the fiberglass is covered with a similar material sprinkled with slate, granite, basalt chips or quartz sand to increase wear resistance.
Shingles from different manufacturers do not have the same dimensions (medium format 1 x 0.35 m), 3 mm thick. There are several types of tile pattern:
- rhombuses;
- bricks;
- shingles;
- rectangles of different formats;
- honeycomb or scales.
The color of the shingles can be multi-chrome or monochrome, different in each box. Therefore, before stacking, all available material from different boxes is mixed in random order. Flexible roof tiles from Shinglas, Tegola or any manufacturer with a 3D effect have the maximum artistic value. The self-adhesive layer does not ensure the reliability of fixing the shingles, therefore the roof is additionally attached to the lathing with nails.
Video: how to choose flexible shingles
Related article:
Ondulin: price per sheet, dimensions. A separate publication provides a detailed overview of this type of roofing, an analysis of prices and manufacturers, as well as the nuances of installation.
Preparatory work
If flexible tiles are included in the roof project, do-it-yourself laying should begin with determining the number of facing, additional, consumables. Make sure that the bottom often of the roofing pie is assembled in accordance with the requirements for this coating.
Payment
Before purchasing the required number of shingles, slats, single carpets, skates, other additional elements, fasteners, a calculation is required to ensure a supply of materials. The approximate consumption is:
- shingles - the box contains 1.5 - 3 m2 depending on the size, taking into account overlaps (indicated by the manufacturer on each box), usually a 5% margin is required;
- mastic - 200 g / m for the valley carpet, 100 g / m for the ends, 750 g / m for the junction points;
- nails - 80 g / m2 when choosing hardware with a 3 mm rod, 9 mm head with a length of 3 cm with galvanized coating.
Helpful information! The underlayment is necessary to create a continuous underlay carpet when slopes are sloped less than 18 degrees, or to process the perimeter of slopes when slopes are greater than the specified value. It is made of 2 mm polyester with a bituminous coating or it is produced in the form of a 2 mm OS HP hydro-barrier without powder.
The valley carpet has a stone powder similar to shingles, abutment strips, cornice overhangs, pediment ones are made of special steel. On the websites of leading manufacturers, there are mandatory calculators for calculating the amount of materials for single, multi-slope, hip, hip, mansard roofs.
Tools
For laying the roofing material in question, a hand tool that is present in the arsenal of a home craftsman is sufficient:
- knife - for cutting bituminous materials;
- scissors - for cutting metal strips;
- hammer - for fastening with nails;
- brush - for smearing with mastics.
Helpful information! In the off-season, in winter, a burner may be required to heat the bitumen layer. Strength decreases, labor intensity increases, therefore warm weather without precipitation is recommended for self-assembly.
Stacking theory
For the convenience of working at a height, the shingles have a small format. They are stacked from the overhang to the ridge with a ledge, so that each upper row overlaps the lower one. Endows, nodes of passages chimneysThe ventilation pipes are processed first. Then the cornice, pediment strips are fixed, the gutter brackets are attached. After that, it remains to fill the surfaces of the slopes with shingles, cutting them in width and length as needed.
Installation technology
If you are laying flexible tiles with your own hands without helpers, it is enough to follow the technology below in order to avoid mistakes, reduce cut waste, and achieve the maximum possible operational resource.
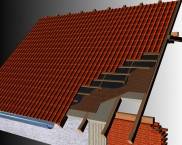
The roofing cake must be prepared accordingly:
- vapor barrier film - mounted on the rafters from the inside attic/ attic to prevent moisture penetration into wooden structures, insulation, however, 100% protection is impossible, some part still gets inside;
- thermal insulation - extruded polystyrene foam or basalt wool, placed between the rafters, partially supported vapor barrier film from falling inside;
- waterproofing (wind protection) - stretched from above insulation, allows moisture to come out, condense on the surface;
- counter-rail - stuffed along the rafters, provides a ventilation gap that allows condensed moisture to be removed from the surface of the waterproofing with air flows;
- crate - solid from OSB boards, multilayer moisture resistant plywood or grooved board.
Important! Solid sheathing made of unedged boards is not allowed, since there is no flatness of the surface of the slopes. All defects will be highlighted with shingles after installation.
Substrate
The lining carpet with a slope of 12 - 18 degrees is created solid. For this, the valley is pasted over with the OS HP hydro-barrier vertically (obliquely), overhangs at the cornices with the same material horizontally. The roll material of the lining carpet is glued to the crate with mastic in horizontal stripes from the bottom / up.
The width of the launch of the hydro-barrier for each slope in the valley is 0.5 m. The sheets of the underlay carpet have an overlap of 15 cm in adjacent rows and 10 cm when increasing the length in the vertical direction. The frequency of fixation with nails is 25 cm, additional coating with mastic is made in the overlap.
Helpful information! When the slope of the slopes is more than 18 degrees, it is enough to process the valleys, overhangs at the cornices, the conjugation of the hip slopes, mansard roofs in this way. In this case, the middle part of the slopes is not processed with a lining carpet.
Installation of planks and gutters
Eaves, gable steel slats are required to reinforce these roof elements. In these areas, one edge of the shingles does not have an overlap, therefore, the likelihood of scoring, loosening during wind loads, and heavy rainfall increases. Metal strips increase the spatial rigidity of the lathing, they are mounted with nails (15 cm pitch + checkerboard pattern) with an overlap of 3 - 5 cm.
Depending on the design and layout of the gutters at the eaves overhang, at the same stage, brackets can be attached to the crate or eaves strips, on which the gutters will be hung out.
Facing stingrays
To have the maximum operational resource of the flexible tile, laying the shingles with your own hands begins with the marking:
- parallel to the eaves overhang or ridge, lines are marked along the entire length of the slope every 0.8 m for every 5 horizontal rows;
- perpendicular to the previous marking, lines are drawn every 1 m for each vertical row.
The resulting mesh allows you to control the location of the sides of each shingle in a row, adjust as needed. Particularly relevant are the markings for roofs with dormers, dormers, chimneys, and ventilation pipes.
Helpful information! It is not necessary to nail the shingles on this grid, it is created for a reference point, facilitates the work of the master.
Shingle mounting technology will include several stages:
- cornice row - cut out of ordinary shingles (models Accord, Sonata, Tango, Trio manufacturer Shiglas) or ridge-cornice strips (modifications Jazz, Accord, Sonata), attached over a steel cornice strip 2 cm from the bend;
- the first row - with a significant length of the slope, work begins from the middle, the indent of the cornice row is 1 - 2 cm for different coating modifications;
- subsequent rows - also from the center, the petals of the pattern are shifted by half or in accordance with the complex patterns of the front part, the lower edge of the shingle should be flush with the upper edge of the cutout of the lower shingle.
Helpful information! Starting from the third row, you should maintain the direction in which the shingle petals are shifted. Otherwise, after a few rows, the overall pattern of the coating will no longer coincide.
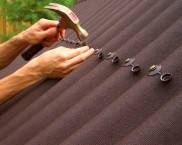
The nails should be placed perpendicular to the slope of the slope so that the head presses the material parallel to it, without distortions. It is not necessary to recessed the heads of the hardware. The punching scheme is present on the manufacturer's box, since it differs depending on the model of the shingles, the slope of the roof.
In the absence of a factory self-adhesive layer, the shingles are coated on the reverse side with mastic 10 cm wide from the upper edge. For the normal release of water with pediment strips, the shingles are cut 2 cm from their edge.
Junction nodes
Depending on the configuration of the roof, ridges (ribs formed by adjacent hip slopes by analogy with a ridge), fractures (conjugation of slopes on one side houses in the attic roof), valleys (internal corners at the junctions of the L-shaped roof, dormer).
There are two options for decorating the valleys:
- open - the shingles are launched on both sides onto the valley carpet, nails are nailed 30 cm from the mating axis, two lines are beaten off with a coated cord parallel to the axis on each slope, the roofing material is cut along these lines, placing a board, glued with mastic, fixed with nails in the usual manner;
- closed - the shingles from one slope (usually with a smaller slope) are launched onto the adjacent one, the nails are pierced 25 cm from the valley axis, 7 cm from the axis on an unheated slope, they beat off a line parallel to the valley axis, cut the shingles, fix them finally, then to this line is adjoined by the shingles of the second slope in the usual order.
Adjacencies (to walls, parapets, other structures) are made using triangular slats ("glazing beads") nailed in the corners of the mates. To do this, a 50 x 50 mm timber is dissolved, the surface of the wall, to which the roof is adjacent, is pre-leveled with plaster or putty. Then, on top of the shingles, a piece of valley carpet 50 cm wide is glued onto the mastic with a launch of 30 cm on the wall.
Helpful information! From above, this piece of valley carpet is closed with a metal strip-apron, the upper side of which is embedded in the seams of the masonry or a line in concrete.
It is better to arrange chimneys, ventilation pipes with special ceramic, steel additional elements. The shingles are adjacent to them or are overlapped from above.
Related article:
Soft roof: types and prices. A separate publication provides a detailed overview of flexible roofing, its characteristics, types and prices, as well as the nuances of installation.
Conclusion
Thus, taking into account the above nuances, shingles can be assembled on their own alone. All manufacturers print on boxes or complete the roofing material with instructions that take into account the peculiarities of a particular shingle modification.
Video: shingles: DIY laying


