Installation of metal tiles: step-by-step instructions with useful recommendations
For the arrangement of the roofing part, metal tiles have been increasingly used lately. The material is supplied in the form of profiled sheets with a polymer coating. If you wish, you can independently perform the installation of metal tiles. Step-by-step instructions will help you do this without serious mistakes.
The content of the article
- 1 Pros and cons of roofing material
- 2 Installation tools
- 3 Basic set of accessories
- 4 Installation instructions for metal tiles: step by step performance of work
- 4.1 Waterproofing and fixation of control bars
- 4.2 Correct installation of the lathing under the metal tile
- 4.3 Installation of parts mounted before sheets
- 4.4 The process of laying and fixing sheets
- 4.5 Installation of end plates and ridge
- 4.6 Additional instructions for the installation of snow guards on metal tiles
- 5 Ordering metal roofing: prices for installation work
- 6 Summarizing
- 7 Video: installation of metal tiles - detailed video instruction
Pros and cons of roofing material
The products are based on a steel sheet with a thickness of 0.45-0.55 mm. It is galvanized and has a special polymer-based coating. The cost of production may vary depending on the thickness of the metal and the type of protective layer.
List of advantages
First of all, the following advantages must be highlighted:
- aesthetic appeal;
- resistance to weathering;
- affordable cost;
- lightness of the main elements.
Note! Polymeric coatings perform not only a protective, but also a decorative function, since their color range can vary in a fairly wide range.
Few disadvantages
Since the sheets are thin and large enough, there is still a risk of damaging them if they are carelessly installed. Subject to all the rules, the integrity of the elements is difficult to break.
Another disadvantage is the appearance of a noise effect during heavy rain during operation. However, with the correct soundproofing living space this disadvantage is completely eliminated.
Related article:
Sizes of a sheet of metal roofing. Prices, brands, types of material., As well as tips for choosing in a separate publication of our online magazine.
Installation tools
It is necessary to prepare in advance a set of tools and accessories for the work:
- electric or simple scissors for metal;
- screwdriver;
- a hammer;
- mechanical stapler;
- tape measure and pencil;
- hacksaw or circular saw.
Note! It is forbidden to cut sheets using abrasive wheels, since high temperature exposure leads to the destruction of not only the polymer, but also the zinc layer.
Basic set of accessories
In the step-by-step instructions for the installation of metal tiles, the main elements used in conjunction with the sheets should be mentioned. They are used depending on the roof configuration and operational characteristics.
It is suggested to take a look at the list of basic parts:
- a skate is required to close the upper joint between two slopes;
- the end plate is necessary for the design of the edges from the side of the pediment overhangs;
- the valley is installed in the places where the slopes are combined;
- the cornice strip is attached from the side of the gutters;
- the abutment bar is mounted in the presence of a pipe and other protruding structures;
- a snow block is needed to prevent snow from sliding off the roof.
Installation instructions for metal tiles: step by step performance of work
Loading and unloading of products can be carried out manually, but during the work a certain number of people must be involved. Usually 1 person is required for 1.5-2 linear meters of sheet length. That is, when unloading metal fragments 6 m long, 3-4 people must be present.
Waterproofing and fixation of control bars
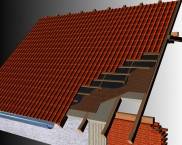
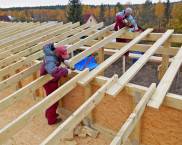
If thermal insulation is laid between the rafters, then the waterproofing material must be present in any case. It is fastened with brackets to the supporting part of the roof. The canvases are spread across the rafter legs with an overlap of at least 15 cm along all slopes.
Bars 50x50 mm are nailed directly along the rafters, providing a ventilation gap between the waterproofing and the roofing material. For fixation, nails of at least 90 mm are used.
Correct installation of the lathing under the metal tile
An edged board 25 mm thick and 100 mm wide is usually used as a lathing, but the final choice will depend on the pitch of the rafters. The elements are attached to 50x50 mm bars using nails at least 70 mm long. The distance between the boards depends on the wavelength of the metal tile used.
In the place where the ridge element is installed, it is recommended to install two strips close to each other. This will simplify the installation of the ridge on the metal tile. The same should be done in the places where the valleys are attached. The bottom board of the sheathing should be higher than the rest by the height of the wave. Usually the thickness of the lining is sufficient to compensate for the difference.
Installation of parts mounted before sheets
To protect the ventilated space under the roof from the penetration of moisture and street debris, the eaves of metal tiles are being installed. An additional ventilation tape must be attached to the ends of the 50x50 mm bars.
When installing the valley, the universal seal is laid. The bottom edge of the element should be on the surface of the eaves.At the horizontal joint, an overlap of at least 30 cm is made.
Brick outline chimney implies the withdrawal of the waterproofing membrane by at least 50 mm. A groove is made in the pipe itself, the depth of which should be at least 15 mm. Water is discharged into a valley located in the immediate vicinity.
The process of laying and fixing sheets
All sheets must be aligned horizontally with a 50 mm crate outlet. When fixing metal elements, the following points should be adhered to:
- the self-tapping screw must be installed in the deflection of the wave, where the sheet is adjacent to the crate;
- to the bottom board, fastening is carried out above the step directly through the wave;
- along the edge of the ramp, fasteners are screwed into each wave.
Installation of end plates and ridge
Elements for closing end joints are mounted in the direction from the eaves overhang to the ridge. The overlap on adjacent strips should be 10 cm.The recommended spacing between the fasteners is 35 cm.
As for the ridge, it is fixed in the upper crest of every second wave. When building up the elements, a gap of at least 15 cm is left. A self-adhesive sealing tape is attached along the entire length.
Additional instructions for the installation of snow guards on metal tiles
The number of elements for holding snow drifts on the roof is selected taking into account the geometry of the roof. In areas of heavy snow removal, two rows of metal profiles can be installed. Through-type snow stoppers are the optimal solution for individual buildings. They are attached using long self-tapping screws to the crate itself through roof... The distance between the fixation points usually ranges from 50-100 cm.
Ordering metal roofing: prices for installation work
If you hire specialists, you will have to spend additional funds. The price for installation of metal tiles per m2 is presented in the table.
Table 1. Average cost of works on the installation of metal tiles
| the name of the operation | Price in rubles |
|---|---|
| Installation of roofing on roofs of simple configuration per square meter | 230 |
| Installation of roofs on roofs of complex configuration per square meter | 270 |
| Waterproofing device with ventilation and lathing per square meter | 180 |
Summarizing
If financial possibilities do not allow hiring workers, then you can do the installation of metal tiles with your own hands. The step-by-step instructions will provide an opportunity to get acquainted with the basic information that will warn against mistakes in the implementation of work.
Video: installation of metal tiles - detailed video instruction


